How to Design a Custom Men’s Polo Shirts: A Step-by-Step Guide at Got Apparel
The classic t-shirt holds a special place in everyone’s wardrobe. Its comfort and versatility make it a timeless favorite. But what if you want to take personalization to the next level? Custom polo shirts offer a perfect blend of casual style and adaptability, making them ideal for various occasions.
Ready to unleash your inner designer? Whether you’re creating for an apparel business or seeking a unique look for yourself, here are some essential tips to help you design eye-catching custom polo shirts:
- Embrace Versatility: Unlike casual t-shirts, polo shirts bridge the gap between formal and casual wear. Consider this flexibility when choosing design elements to ensure your creation is suitable for diverse settings.
Let’s Get Started! With these tips as your guide, dive into the exciting world of designing your custom polo shirt.
Strike the Perfect Balance
When it comes to creating a custom design for a polo shirt, you need the perfect balance between size and design. Here’s what you can do,
Balancing Clarity and Comfort
Polo shirts, often seen in corporate settings, demand a balance between impactful design and comfortable wear. This means carefully considering the size of your chosen design elements like logos, slogans, or text.
Finding the Sweet Spot
The key is ensuring the design is neither too large to overwhelm the shirt nor too small to be illegible. Aim for a size that complements different shirt sizes, maintaining clarity without compromising comfort.
Purposeful Design
Remember, your design’s purpose plays a crucial role. For brand promotion, a simple approach with a prominent logo placed on a complementary color is ideal. Adding small, subtle shapes like circles, dots, or squares can further enhance the brand message.
Less is More
Always prioritize clarity and we arability. The design shouldn’t overwhelm the wearer or become uncomfortable to wear. For a better understanding of size, consider printing your design on A4 paper and visualizing it on a polo shirt to check its scale and impact.
By following these tips, you can ensure your custom polo shirt design strikes the perfect balance between eye-catching appeal and comfortable we arability.
Design Placement
The second step is to find the accurate design placement. Trust us when we say no matter how aesthetic your design may be if it isn’t placed correctly, then it won’t look good at all.
- Finding the sweet spot: After finalizing your design, the next step is choosing the ideal placement that maximizes visibility while complementing the overall look of the polo shirt.
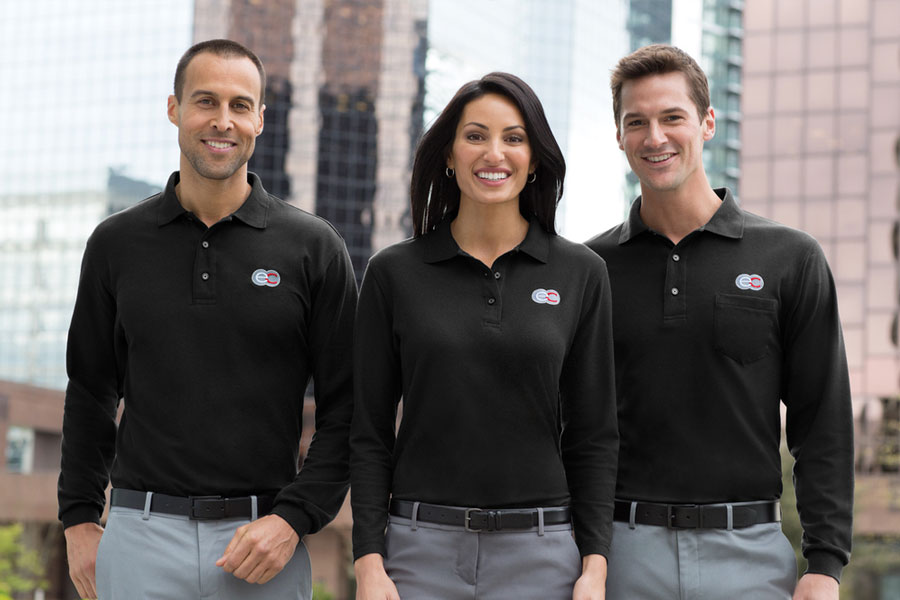
- Classic Choice: For most polo shirts, the standard placement is on the left chest, approximately four inches below the collar. This position creates a balanced and professional appearance.
- Full Coverage Options: While the left chest placement reigns supreme, you also have the option of covering the entire front or back of the polo shirt with your design. This bold approach works well for large, statement-making graphics but requires careful consideration to avoid overwhelming the viewer.
- Forbidden Zone: One area to avoid for design placement is the abdomen. This region can disrupt the clean lines and professional aesthetic of a polo shirt.
Remember: When in doubt, the classic left chest placement is always a safe and stylish choice.
Power of Typography
Text matters! Choosing the right font and typography can elevate your Wholesale T-shirt design from good to great. Here’s what to consider:
Spacing and Arrangement
- Spacing: Pay close attention to letter spacing, word spacing, and line spacing for optimal readability.
- Arrangement: Ensure the text integrates seamlessly with any graphics, creating a cohesive and balanced look.
Font Selection
- Formal vs. Casual: For a corporate polo, consider fonts like Montserrat, Special Elite, or Oswald, which convey a professional tone. Avoid using all caps, as it can appear harsh in formal settings.
- Variety with Limits: For a more dynamic design, use a maximum of three contrasting fonts. Experiment, but don’t overwhelm the viewer.
Image and Text Harmony
- Before Printing: Always create a layout to visualize how your chosen image and text interact. This ensures both elements complement each other effectively.
By following these tips, you can harness the power of fonts and typography to create a truly captivating T-shirt design!
Ensure High-Quality Printing
Creating a custom T-shirt is exciting, but a crucial factor often overlooked is image quality. Low-resolution images, unfortunately, lead to blurry, pixelated prints that detract from your design.
Here’s what you need to know:
Resolution Matters
- Minimum: Aim for 200 dpi (dots per inch) at full size. This ensures decent print quality.
- Optimal: 300 dpi is the golden standard for exceptional sharpness and detail.
Choosing the Right Image Source
- Scanning: This preserves the original resolution of physical photos.
- Downloaded and Resaved Files: Be cautious; downloading or resizing images can decrease resolution.
- Vector Files (PDF, EPS, AI, SVG): These are ideal! They maintain quality regardless of print size due to their mathematical composition.
Remember
- Check our T-shirt printing guide for further details.
- Choose high-resolution images or vector files to guarantee stunning results for your customized T-shirt.
By following these simple tips, you’ll transform your vision into a vibrant, high-quality T-shirt that you’ll be proud to wear!
Colors and Contrast
Color is the lifeblood of any design, and choosing the right one for your T-shirt can be both exciting and challenging. But don’t worry, we’re here to help!
Considering Cost
- Solid Colors and Budget: T-shirt printing is a cost-effective option for simple designs with few colors. This is perfect for those working with a limited budget.
- Full-Color Freedom: If your budget allows, Direct-to-Garment (DTG) printing offers unlimited colors. This means you can print any photo, text, or intricate design with vibrant colors.
Finding the Balance
While DTG unlocks a world of possibilities, consider this:
- Polo Shirts and Professionalism: For a more formal look, it’s generally recommended to use a maximum of three colors for polo shirts. This creates a clean and professional aesthetic.
Ultimately, the choice is yours! Whether you prioritize cost-effectiveness with solid colors or unleash your creativity with DTG printing, these tips will help you navigate the colorful world of T-shirt design.
Final Thoughts
The world of custom apparel, particularly polos, is booming! This trend presents a lucrative opportunity for those looking to break into the clothing industry.
If you’re considering starting a T-shirt business, remember this: creating stunning designs is key to success. The tips above will equip you with the knowledge to:
- Craft high-quality visuals with the right resolution.
- Choose fonts and typography that enhance your message.
- Select colors that make your design pop while considering cost-effectiveness.
By mastering these aspects, you can transform your vision into eye-catching T-shirts that will resonate with your target audience and help your business flourish in the exciting world of custom apparel.